Ever wondered why your prints don’t come out exactly as you designed them? The answer could be in the bleed settings. Today, we’re diving into the nitty-gritty of what bleed is and how to set it up for perfect prints.
what is bleed?
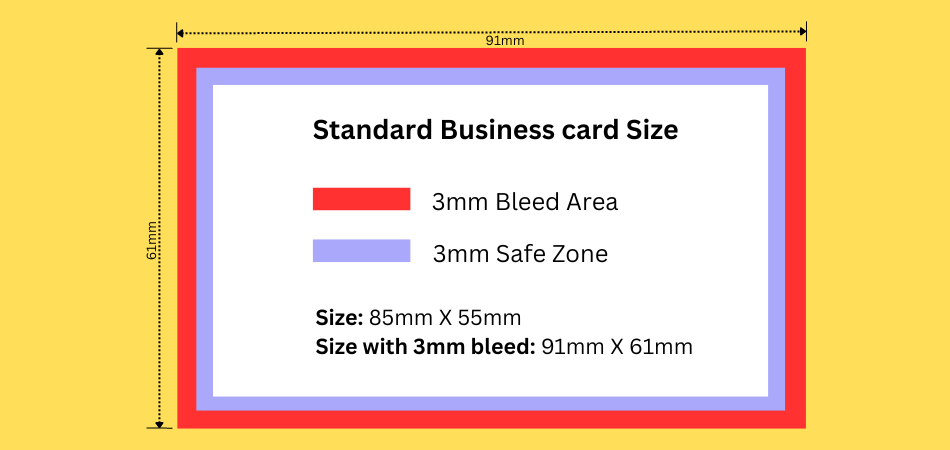
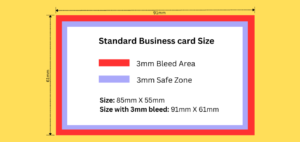
In printing terms, bleed refers to the area of your design that extends beyond the actual dimensions of the paper. It’s a buffer zone, ensuring that your design covers the entire page, edge to edge. In most of cases it is 3mm bleed for the printing in the UK, like business cards, Letterheads or personalised notepads.
Why does bleed matter?
Well, when your design is printed, the machine that cuts the paper isn’t always perfect. Even with new tech, it might cut a tiny bit too far, going past where it’s supposed to. If your design doesn’t have this extra bit, or bleed, you’ll end up with thin white lines at the edges of your printed item.
The Necessity of Bleed in Printing
You might think, “I’ve printed stuff at home and never worried about bleed.” True, but professional printing is a different ball game. Here, precision is key.
Avoiding White Edges: No one likes a print job that screams amateur. White edges do just that.
Design Consistency: If you’re printing multiple items like business cards, consistency is crucial. Bleed ensures every print is a carbon copy of the other.
Meeting Standards: Many print shops won’t even accept your job without the correct bleed settings. It’s an industry standard for a reason.
Talking Numbers: How to Measure Bleed
So, how big should the bleed be? In most cases, a 3mm bleed on all sides of your design will do the trick.
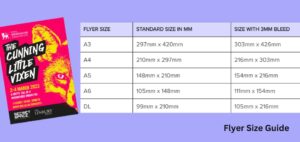
To measure this, you’ll need to extend your design elements 3mm beyond the page’s actual dimensions. For example, if you’re working on an A4 sheet (210mm x 297mm), your design should actually be 216mm x 303mm to account for the bleed.
A Step-by-Step Guide to Setting Up 3mm Bleed
Setting up bleed isn’t rocket science, but it does vary depending on the software you’re using. Here’s a quick rundown:
Adobe Photoshop: Go to ‘File’ > ‘New’ and add 6mm to the width and height for your 3mm bleed. Then use guides to mark the actual page size.
Adobe Illustrator: Open ‘File’ > ‘New’ and enter the bleed directly into the ‘Bleed’ fields. Illustrator does the math for you.
Also Read: Business Card Size & Dimensions Guide UK
Pitfalls and How to Dodge Them
Even with the best intentions, mistakes happen. Here are some common pitfalls:
Not Enough Space: Always ensure you’ve got enough room for a 3mm bleed. Skimping here can ruin your print.
Ignoring Text: Keep text and vital elements at least 3mm away from the edge. You don’t want half a letter missing.
Double-Check: Before sending your design to print, double-check the bleed settings. A small oversight can lead to a costly mistake.
Also Read: What Is GSM Paper – Complete GSM Paper Guide
Conclusion
Setting up bleed correctly ensures your prints come out just as you envisioned. A 3mm bleed is generally the go-to size for most print jobs. So, the next time you’re prepping a design for print, don’t forget to set up your 3mm bleed. It’s a small step that makes a big difference.
Want to get your prints perfect every time? Order your printing products online with Disoverprint.
